

Where To Take My Macbook Pro For Repair?
What do I practise with a Mac that still has personal data on it? Do I have out the disk drive and smash it? Do I sweep it with a really strong magnet? Is in that location a difference in how I handle a hard drive (HDD) versus a solid-land drive (SSD)?
Well, taking a sledgehammer or projectile weapon to your old machine is certainly one way to make the information irretrievable, and information technology can be enormously cathartic equally long as you follow appropriate safety and disposal protocols. But there are far less destructive ways to make sure your data is gone for good. Let me innovate you to secure erasing.
Your reckoner and the external drives y'all may utilize store all of your personal data. The computer's drive will contain all of your emails, contacts, documents, and more—in other words, all of the sensitive data that yous wouldn't want to share with other people. Hackers looking to exploit data that provides access to passwords or your identity are particularly interested in getting their hands on this data. Earlier you get rid of your old calculator, whether that's tossing it or selling information technology, it'southward all-time practise to ensure all of that data has been deeply erased from your drive so that it tin can't be accessed past anyone else.
Which Blazon of Bulldoze Practice Yous Accept?
Earlier we starting time, you lot need to know whether you lot take a HDD or a SSD. Around 2022, Apple moved to using merely SSD storage in its devices, although its desktop computers continue to offer the pick of both SSD and HDD storage. Apple tree besides now features devices with Flash SSDs, a hybrid of HDDs and SSDs. If yous bought your device before 2022 or you take a desktop figurer, in that location'due south a chance you may exist using an HDD. For people using older models, yous may be looking to erase your drive earlier y'all upgrade or change devices.
To find out whether your device has a HDD or SSD, or at to the lowest degree to make sure, click on the Apple carte du jour and select "About this Mac." Once there, select the "Storage" tab to see which type of drive is in your organization.
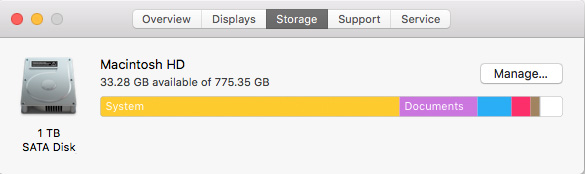
The start example, below, shows a SATA Disk (HDD) in the organization.
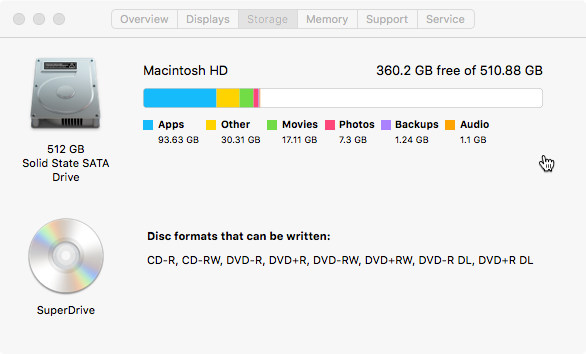
In the side by side case, nosotros see we accept a solid state SATA Bulldoze (SSD), plus a Mac SuperDrive.
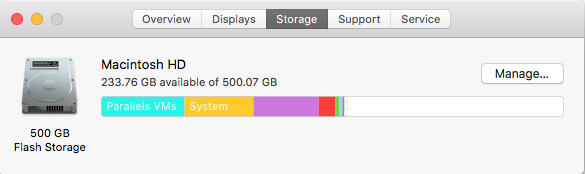
The third screenshot shows an SSD too. In this case information technology's called "Flash Storage."
Make Certain You Have a Backup
Before you go started, y'all'll want to make sure that any important information on your hard drive has moved somewhere else. macOS's congenital-in Fourth dimension Auto backup software is a proficient first, particularly when paired with Backblaze Computer Backup. You can learn more than about using Time Machine in our Mac Backup Guide.
With a local backup copy in hand and secure deject storage, you know your data is ever prophylactic no matter what happens. We phone call this the 3-two-1 fill-in strategy—information technology keeps your data safe while y'all erase your hard drive without losing any of information technology when yous move to a new device. To learn more than about this rule and other means to keep your information safe, cheque out our guide on different fill-in strategies.
Once you've verified your data is backed up, scroll up your sleeves and become to work. The key is macOS Recovery—a special part of the Mac operating arrangement since Os 10.7 Panthera leo.
How to Wipe a Mac Hard disk drive Bulldoze
Since Nov 2022, Apple debuted its first Macs equipped with M1 chips, notably in the 13-inch MacBook Pro, MacBook Air, Mac mini, iMac, and iPad Pro models. This silicon flake benefits in performance from the previous Intel-based Mac, but it also ways that the steps to erasing each drive differ slightly.
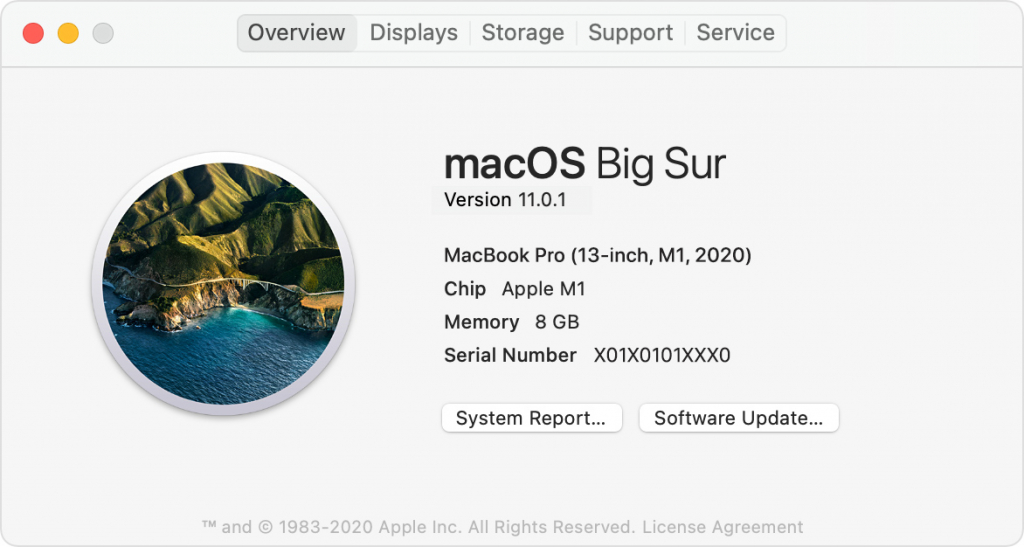
To check what kind of fleck you take in your Mac, go to your Apple carte and select "About This Mac." If your computer has an M1 fleck, you will run across the give-and-take "Chip" followed past the proper name of the chip, as in the image below.
If you take an Intel-based Mac, you will run into "Processor," instead, followed by the name of an Intel processor.
How to Wipe an Intel-based Mac
- Starting with your Mac turned off, press the ability button, then immediately hold downward the control and R keys and wait until the Apple logo appears.
- When the Recovery window appears, select Disk Utility.
- In the sidebar, cull Macintosh Hard disk drive.
- Click the "Erase" button, and so select a file organization format and enter a proper name for it. Your options for a file organisation format include Apple tree File Organisation (APFS), which is the file organisation used past macOS 10.13 or later; Mac OS Extended, which is the file arrangement used by macOS 10.12 or earlier.
- Optionally and if it's available, select "Security Options" and utilise the slider to cull how many times to write over the erased data, and then click "OK." (Secure erase options are available merely for some types of storage devices. If the "Security Options" button is non bachelor, Disk Utility cannot perform a secure erase on the storage device.
- Click "Erase," and so click "Done."
In that location are four notches to that "Security Options" slider. "Fastest" is quick but insecure—data could potentially be rebuilt using a file recovery app. Moving that slider to the correct introduces progressively more than secure erasing. Disk Utility's most secure level erases the information used to access the files on your disk, so writes zeros beyond the disk surface seven times to help remove whatever trace of what was there. This setting conforms to the DoD 5220.22-M specification. Acquit in mind that the more secure method you lot select, the longer it volition take. The most secure methods tin add hours to the procedure.
How to Wipe a Mac With an M1 Chip
- Turn on your Mac and go along to press and hold the power button until the startup options window comes up. Click "Options," and then click "Continue."
- When the Utilities window appears, select Disk Utility.
- In the sidebar, choose Macintosh Hd.
- Click the "Erase" button, and so select a file system format and enter a proper noun for it. For Macs with an M1 chip, your option for a file system format is simply APFS.
- Click "Erase Volume Grouping."
Notation: If yous're interested in wiping an SSD, meet the section beneath.
In one case information technology's done, the Mac's hard bulldoze will be make clean equally a whistle and ready for its next take a chance: a fresh installation of Os Big Sur, being donated to a relative or a local clemency, or just sent to an e-waste facility. Of course, you can still drill a pigsty in your disk or smash information technology with a sledgehammer if it makes yous happy, but now you know how to wipe the data from your quondam computer with much less ruckus.
The to a higher place instructions apply to older Macintoshes with HDDs. What do you practise if you take an SSD?
Securely Erasing SSDs, and Why Not To
If your Mac comes equipped with an SSD, Apple's Disk Utility software won't really let you lot naught the hard drive.
Wait, what?
In a tech note posted to Apple's own online Cognition Base, Apple tree explains that secure erase options are not available in Disk Utility for SSDs.
In fact, some folks will tell you not to zero out the data on an SSD, since it tin cause clothing and tear on the retentivity cells that, over fourth dimension, can affect its reliability. This shouldn't be nigh as big an outcome as it used to be considering SSD reliability and longevity has improved.
If "Standard Erase" doesn't quite make you feel comfortable that your data can't be recovered, at that place are a couple of options.
FileVault Keeps Your Data Safe
One way to make sure that your SSD'south data remains secure is to use FileVault (come across "All About FileVault: Encryption for Your Mac"). FileVault is whole-disk encryption for the Mac. With FileVault engaged, y'all demand a password to access the information on your hard bulldoze. Without it, that data is encrypted.
There'due south one potential downside of FileVault—if you lot lose your countersign or the encryption primal, you're screwed: You're non getting your information back any time soon. Losing a FileVault primal happens more than frequently than it should.
When you starting time set up a new Mac, you're given the choice of turning FileVault on. If you don't do it and so, y'all can plow on FileVault at any time by clicking on your Mac's System Preferences, clicking on "Security & Privacy," and clicking on the FileVault tab. Exist warned, all the same, that the initial encryption process can take hours, as will decryption if you lot always need to turn FileVault off.
With FileVault turned on, you can restart your Mac into its Recovery System (by restarting the Mac while holding downwardly the command and R keys) and erase the difficult drive using Disk Utility, one time yous've unlocked it (by selecting the disk, clicking the File menu, and clicking "Unlock"). That deletes the FileVault key, which means whatever data on the bulldoze is useless.
Present, most Macs manage disk encryption through the T2 bit and its Secure Enclave which is entirely sandboxed from the chief estimator itself. This is why Filevault has no CPU overhead—it'southward all handled by the T2 chip. Although FileVault doesn't impact the performance of most modern Macs, I'd suggest only using it if your Mac has an SSD, not a conventional HDD.
Securely Erasing Gratuitous Infinite on Your SSD
If you don't want to take Apple tree'southward word for it, if you lot're non using FileVault, or if you lot just want to, there is a way to securely erase gratis space on your SSD. Information technology'south a little more than involved but it works.
Earlier we go into the nitty-gritty, permit me state for the record that this really isn't necessary to do, which is why Apple'southward made it so hard to exercise. Just if you lot're fix on it, you'll need to employ Apple's Last app. Last provides you with control line interface admission to the Os X operating system. Terminal lives in the Utilities folder, only you can access Terminal from the Mac'southward Recovery Arrangement, too. Once your Mac has booted into the Recovery partition, click the Utilities carte du jour and select Terminal to launch it.
From a Last control line, blazon:
diskutil secureErase freespace VALUE /Volumes/DRIVE
That tells your Mac to securely erase the free space on your SSD. Yous'll need to change VALUE to a number between 0 and 4. 0 is a single-pass run of zeroes, 1 is a single-pass run of random numbers, ii is a vii-pass erase, 3 is a 35-pass erase, and four is a 3-pass erase. Drive should be inverse to the name of your hard bulldoze. To run a vii-pass erase of your SSD drive in "JohnB-Macbook," you would enter the following:
diskutil secureErase freespace 2 /Volumes/JohnB-Macbook
And recall, if you used a infinite in the name of your Mac'south hard drive, you demand to insert a leading backslash before the space. For example, to run a 35-pass erase on a hard drive called "Macintosh HD" you enter the following:
diskutil secureErase freespace 3 /Volumes/Macintosh\ Hard disk drive
Something to recollect is that the more extensive the erase procedure, the longer information technology will take.
When Erasing Is Not Enough—How to Destroy a Drive
If you absolutely, positively, need to exist sure that all the data on a bulldoze is irretrievable, see this Scientific American commodity (with contributions by Gleb Budman, Backblaze CEO), "How to Destroy a Hard Bulldoze—Permanently."
• • •
Since you're interested in SSDs, y'all might relish reading other posts in our SSD 101 series. And if you'd like to learn how to securely erase a Windows PC HDD or SSD, take a look at our guide here.

Source: https://www.backblaze.com/blog/how-to-wipe-a-mac-hard-drive/
Posted by: shannonarpich.blogspot.com
0 Response to "Where To Take My Macbook Pro For Repair?"
Post a Comment